Copycat Hershey’s Chocolate Kisses Candy (dairy-free!)
This post may contain affiliate links. As an Amazon Associate and an affiliate for other programs, I earn a commission from qualifying purchases. Read the disclosure policy for more information.
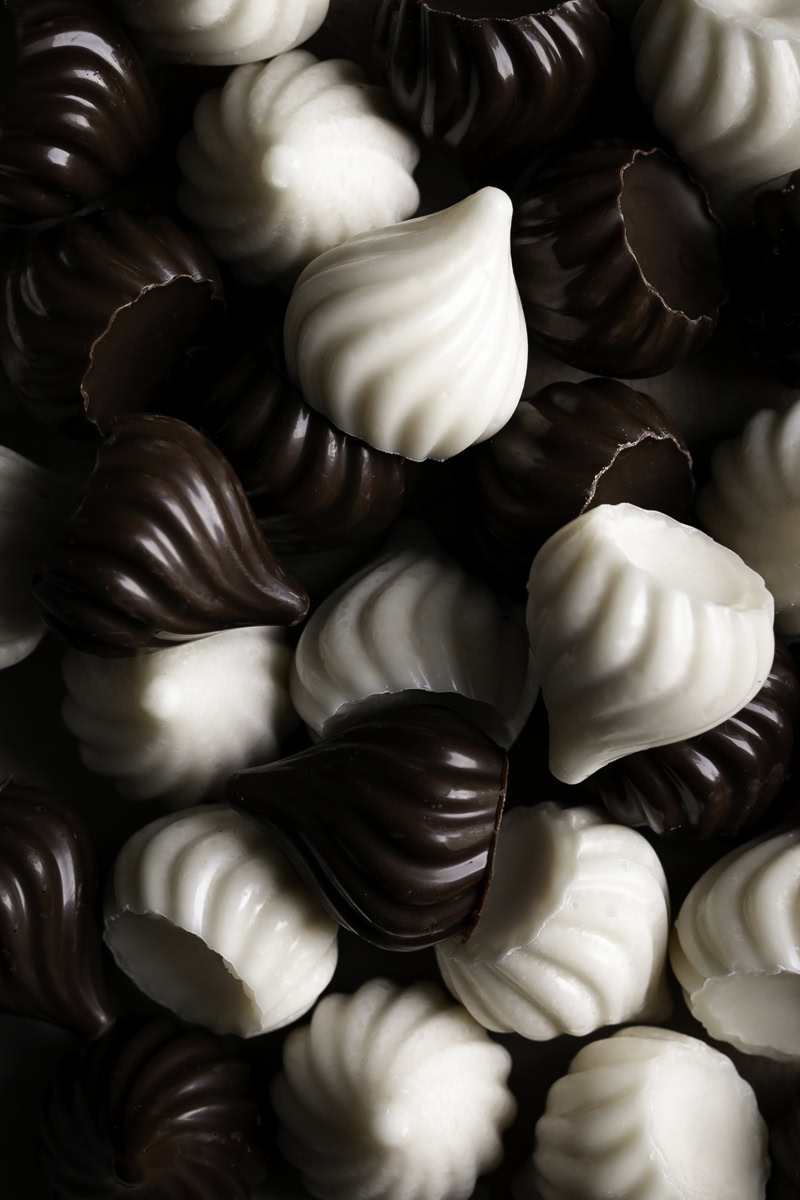
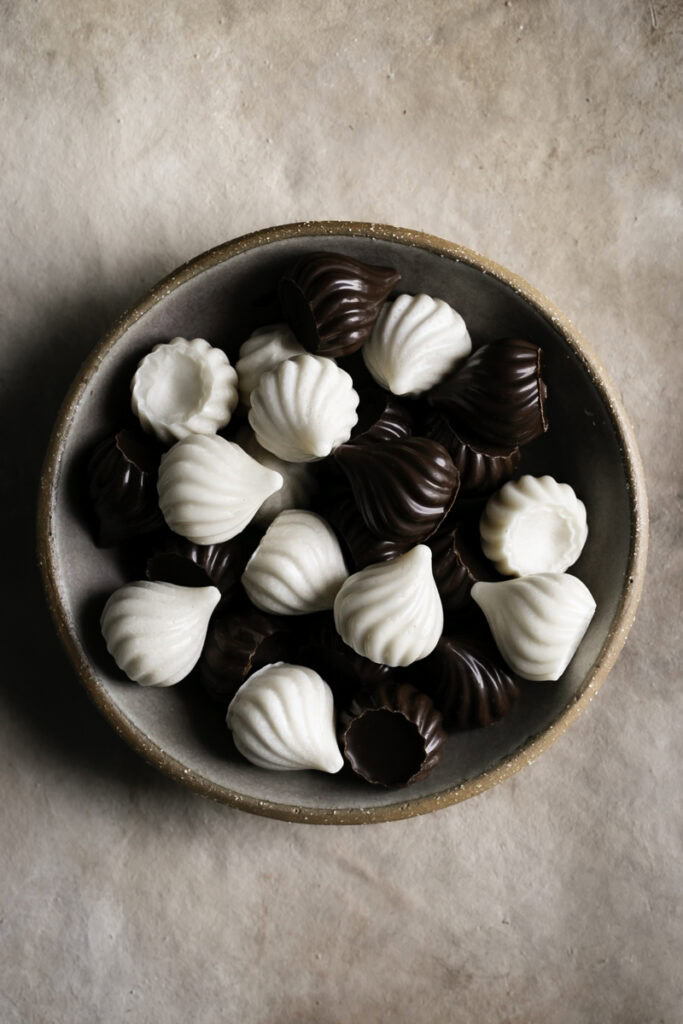
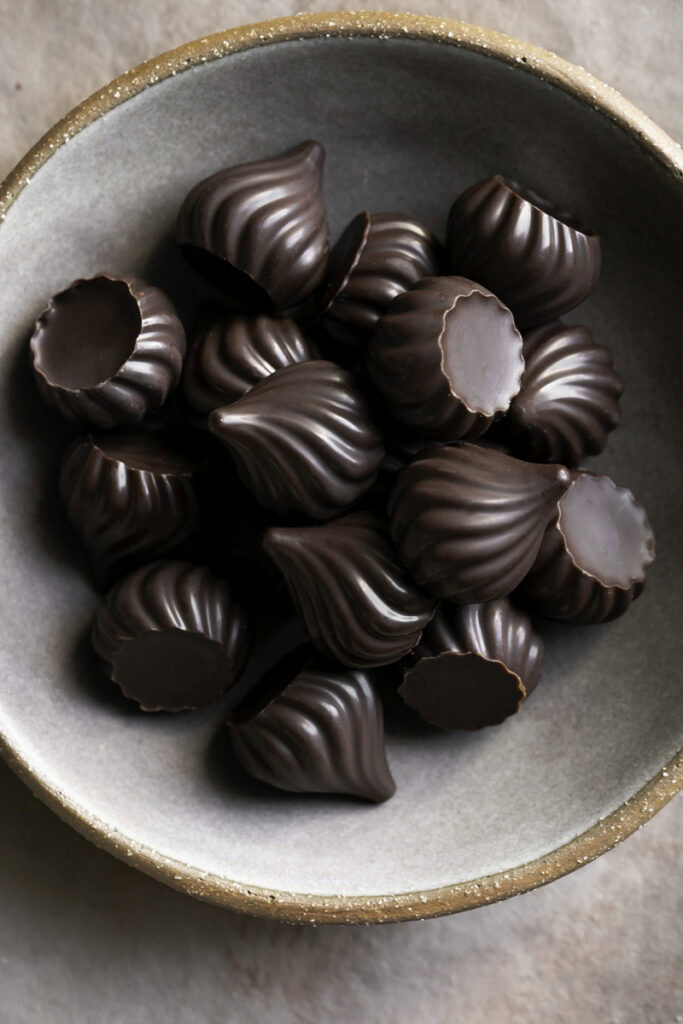
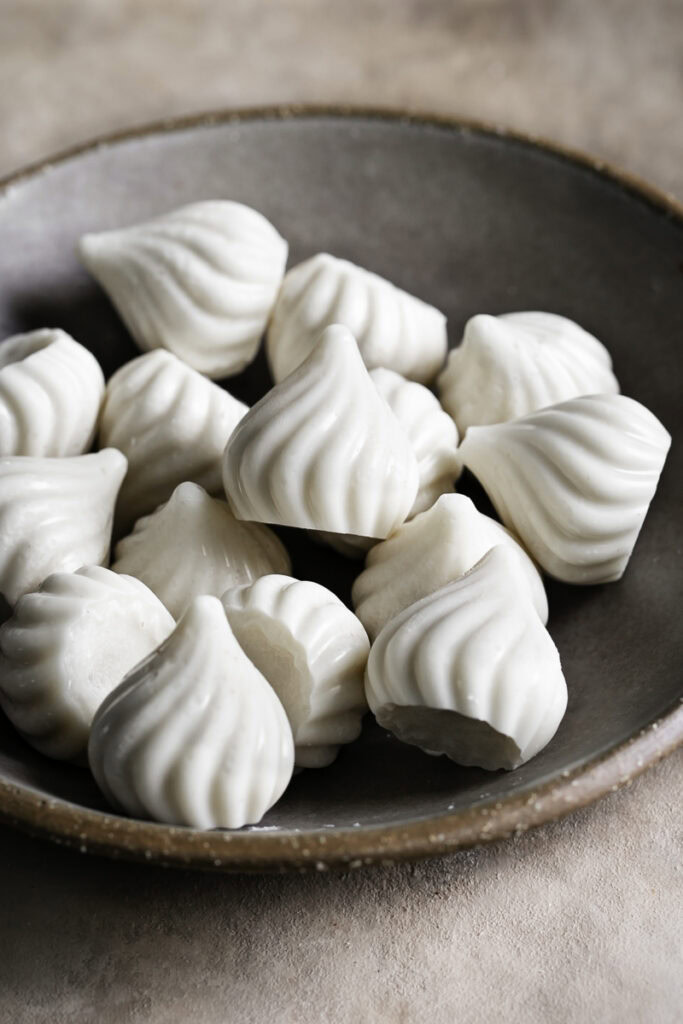
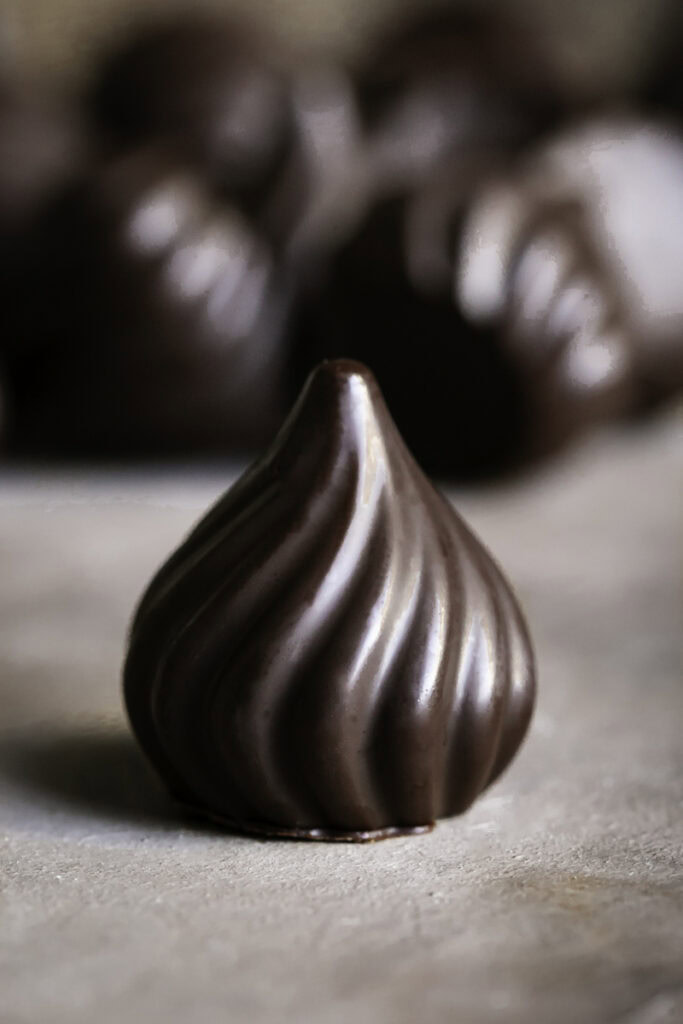
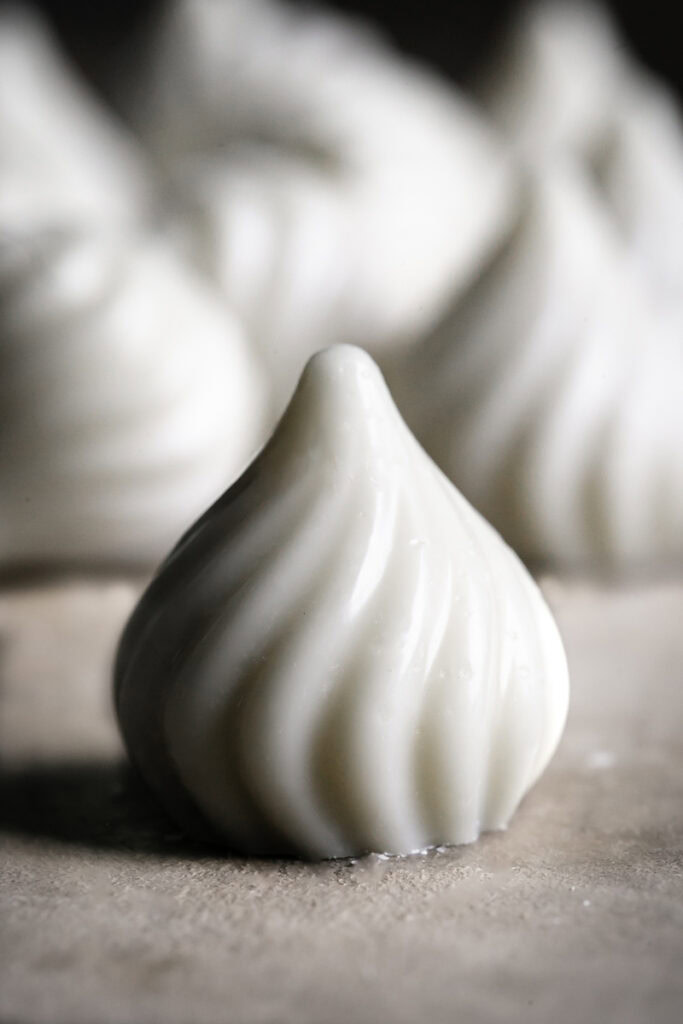
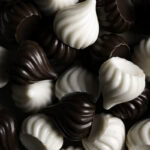
Making your own homemade Copycat Hershey’s Chocolate Kisses Candy (dairy-free!) is easy and fun! Make chocolate or white chocolate kiss candies using just 2 ingredients and a special candy mold. You can make one of America’s most popular chocolate candies dairy-free right at home!

Ever since I made my Almond Flour Peanut Butter Blossom Cookies I have been obsessed with making my own chocolate kisses! I adore the chocolate kisses candy mold (affiliate link) I found on Amazon and I love the swirly texture it creates in the chocolates 😍. I thought it would be a great idea to add a whole post on how to make your own Copycat Hershey’s Chocolate Kisses with tips to make them look and taste the best for all your dessert recipes or just to enjoy all on their own.
Why Make Your Own Copycat Hershey’s Chocolate Kisses
Hershey’s Chocolate Kisses have been around for a long time and is one of the most popular chocolate candy brands that line the shelves at grocery stores. They come in all kinds of flavors too, which is super fun! Unfortunately for me and others who have a dairy intolerance or allergy, we can’t enjoy this beloved treat. So I wanted to make my own at home, without the dairy, using my favorite chocolate and share them with all of you 🥰. I plan to make more flavors now that I have a great chocolate kisses candy mold (affiliate link).
Not only do you have full control of the exact ingredients being used to make these homemade kisses, but it’s super easy and fun!
The Chocolate Candy Mold
While there isn’t an exact Hershey’s Kisses candy mold that I have found, this chocolate kisses candy mold (affiliate link) is the closest thing to it and I actually love the swirl texture. It’s easy to use and makes the perfect “kiss”, or as they call it, “flame” shaped candies.
Ingredients
Chocolate chips. With this particular chocolate kisses candy mold (affiliate link), 1 cup of chocolate chips is the perfect amount to fill the 15 candy cavities. You can use dark chocolate or dairy-free semi-sweet chocolate chips. You can also make these copycat Hershey’s Kisses with dairy-free white chocolate chips (affiliate link) like I did!
Coconut oil. I decided to add 1/2 teaspoon of coconut oil to the melted chocolate, not only to make the melted chocolate a bit runnier, more pourable of a consistency, but also to help the chocolates have that rich, smooth chocolate shine when you pop them out of the chocolate mold. You can read more about why I recommend adding coconut oil below.
How To Make Homemade Chocolate Candy Kisses
You’ll want to start by placing the candy mold on a baking sheet or plate. This makes it easier to transfer into the fridge so the melted chocolate can harden. Add the chocolate chips and coconut oil to a glass measuring cup or a microwave safe bowl and melt the chocolate in the microwave for 30 seconds. Stir the chocolate for a few seconds to make sure it is completely smooth and melted. If you need to melt it further, add it back into the microwave in 10 second increments, stirring in between. Alternatively you may use the double broiler method to melt the chocolate.
Pour the melted chocolate into each cavity of the candy mold up to the top. Once all the molds are full, gently stretch the mold in all directions to ensure the melted chocolate is spread in all parts of the mold. Lightly tap the baking sheet or candy mold on the counter to release any air bubbles and then place the mold into the refrigerator for 30 minutes to set up.
Pushing from the bottom (the candy tip) pop the chocolates out of the mold. Store the chocolate candy kisses in an airtight container either at room temperature or in the fridge if desired.
Recipe Tips & FAQ’s
Place the candy mold onto a baking sheet or plate.
Placing the candy mold on a baking sheet or plate makes it easier to transfer the chocolate mold into the refrigerator to set up. Make sure to make space in your fridge!
Don’t skip the coconut oil.
Using coconut oil helps for a couple different reasons. For one, it helps the melted chocolate consistency to be a little runnier so it’s easier to pour into the mold. That allows the chocolate to spread and coat the mold completely so you don’t end up with air bubbles or a flat and broken candy tip. Two, it helps the chocolate to have that nice and shiny, glossy finish. I have made these candy kisses without adding the coconut oil and they turned out ok, but a lot of the candy tips were either flat or broken. These chocolates turned out much better adding the coconut oil.
Fill each individual mold up to the top.
Filling each mold with melted chocolate up to the top helps the bottoms of the chocolates to be flat. Otherwise you’ll get a dip on the bottom, which isn’t a huge deal, but if you’re a perfectionist like me, you’ll enjoy a nice even, flat candy bottom 😆.
Tap the candy mold on the counter.
Tapping the baking sheet/chocolate mold on the counter helps to release any bubbles and to fully get the chocolate all the way down in the mold so you have a nice rounded, pointed candy top. It also helps to gently pull and stretch the silicone candy mold to allow the melted chocolate to spread into all the little nooks and crannies for the smoothest chocolate texture.
Recipes Using Copycat Hershey’s Kisses
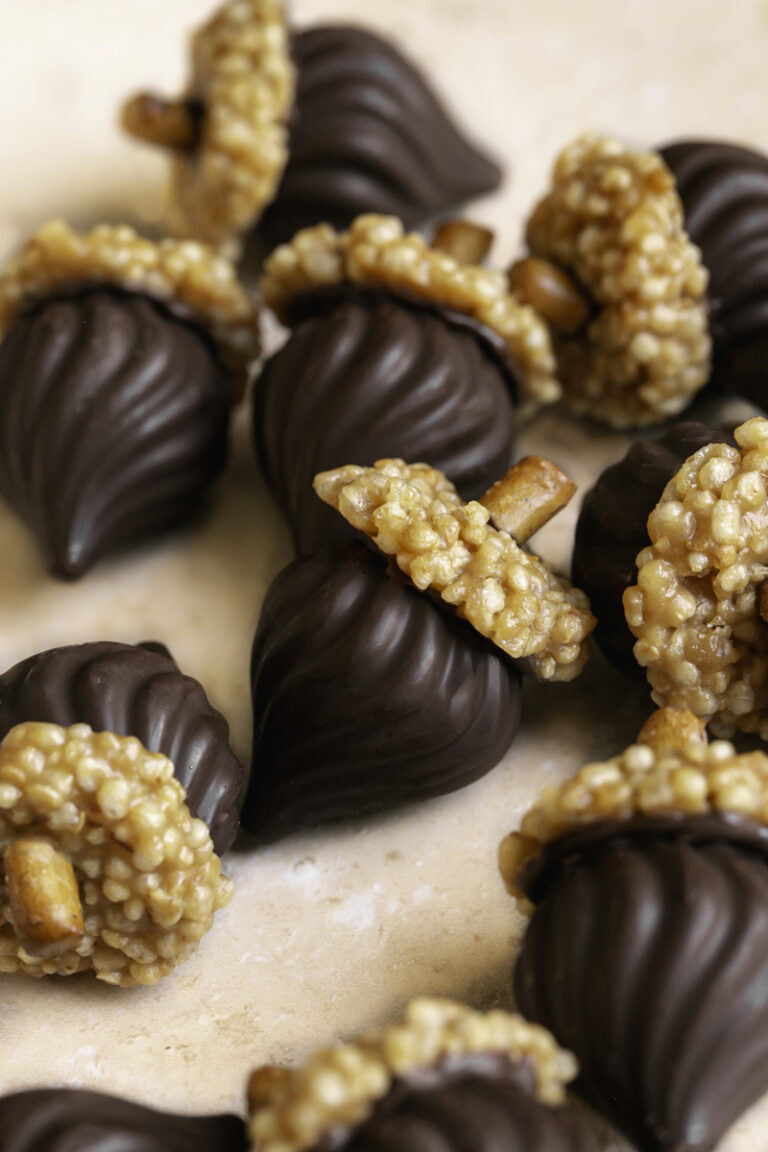
Chocolate Acorns
These easy and adorable Chocolate Acorns are the perfect DIY Fall chocolate treat. Dairy-free dark chocolate is molded into the chocolate candy kiss shape, topped with a mini no-bake, crispy quinoa cookie, and then finished with gluten-free pretzel pieces as the acorn stems!
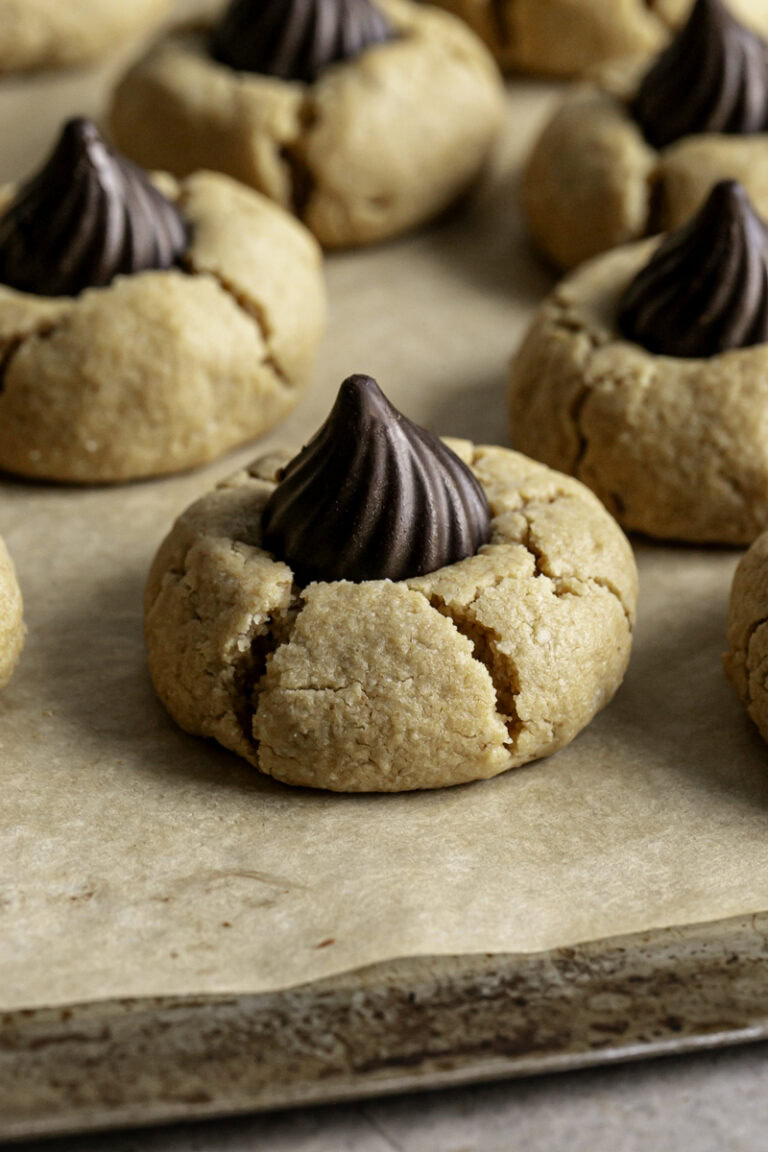
Almond Flour Peanut Butter Blossom Cookies
These Almond Flour Peanut Butter Blossom Cookies are a simple gluten-free, vegan version of the popular peanut butter blossoms we all love so much! The almond flour peanut butter cookies are made with only 6 ingredients and then garnished with a dairy-free chocolate candy.
Let me know what you think about this easy Homemade Copycat Hershey’s Chocolate Kisses Candy recipe down below in the comments section, as well as giving it a five rating ⭐️⭐️⭐️⭐️⭐️ so that others can discover a dairy-free version of the beloved Hershey’s Chocolate Kisses! Tag me on Instagram, Facebook, or Pinterest if you make them!

Copycat Hershey’s Chocolate Kisses Candy (dairy-free!)
- Total Time: 35
- Yield: 15–18 candies 1x
Description
Making your own homemade Copycat Hershey’s Chocolate Kisses Candy (dairy-free!) is easy and fun! Make chocolate or white chocolate kiss candies using just 2 ingredients and a special candy mold. You can make one of America’s most popular chocolate candies dairy-free right at home!
Ingredients
1 cup dairy-free chocolate chips, regular or white chocolate
1/2 teaspoon coconut oil
Special Equipment
chocolate kisses candy mold (affiliate link)
Instructions
-
You’ll want to start by placing the candy mold on a baking sheet or plate. This makes it easier to transfer into the fridge so the melted chocolate can harden. Add the chocolate chips and coconut oil to a glass measuring cup or a microwave safe bowl and melt the chocolate in the microwave for 30 seconds. Stir the chocolate for a few seconds to make sure it is completely smooth and melted. If you need to melt it further, add it back into the microwave in 10 second increments, stirring in between. Alternatively you may use the double broiler method to melt the chocolate.
-
Pour the melted chocolate into each cavity of the candy mold up to the top. Once all the molds are full, gently stretch the mold in all directions to ensure the melted chocolate is spread in all parts of the mold. Lightly tap the baking sheet or candy mold on the counter to release any air bubbles and then place the mold into the refrigerator for 30 minutes to set up.
-
Pushing from the bottom (the candy tip) pop the chocolates out of the mold. Store the chocolate candy kisses in an airtight container either at room temperature or in the fridge if desired.
Notes
READ THE BLOG POST FOR MORE INFORMATION & TIPS!
If you wish to make more, or want to make both chocolate and white chocolate kisses, I suggest purchasing 2 chocolate kisses candy molds
- Prep Time: 35
- Category: Dessert